Pages

Saturday 14 May 2011

Final Post for MEDI 259!

Well here it is, the final post for this project, MEDI 259 The Experiment Project.

It’s been a fantastic journey creating something I’ve always dreamed of doing but first I shall talk about the exhibition before getting all gushy about my dreams and stuff haha!

The exhibition was a really great experience and so exciting to see everyone’s work as for the past 2 weeks we’ve all been keeping to ourselves being busy making final touches to our work.

But now that it’s all done it was a truly great day to see some incredible work from everyone and see everyone in general!

I particularly liked Anastasija and Joshua’s piece on Milk used to make clothes as I remember her saying about doing it back in December but they have truly outdone themselves as it’s incredible.

I also loved James Wright and Andy Warren’s piece which was gruesome but so well done you loved it haha!

These were only two mind of the other brilliant work shown in Scott building and I cannot wait till next year when we finally begin year 3 and move on up into the world. Gulp!

But before we go there, I shall sign off this project’s blog by saying I have had a really enjoyable time working on this project from day 1 as it has always been something I’ve wanted to do and I am over the moon with the result and the praise it got. In fact, It was voted the third best video of the exhibition by my coursemates and though prizes were only given to the 1st and 2nd places, this doesn’t bother me what so ever as I am truly thrilled to have come in the top 3, let alone the top 15 it was chosen out of. :)

So here at last is a link to my Vimeo account and the page for “Professor Marble and His Music machine” which I uploaded today:

http://vimeo.com/23913478

Note this post was made after the hand in deadline but I hope you can forgive me as I wanted to talk about the exhibition and also I have re-edited this post to include the link to the video. The video was uploaded today (18th May) so to cause any confusion the post here was made on sat 14th may after the exhibition, but the link and video are recent. :)

So there we go! It’s had ups and downs, stress and enjoyment but overall I loved every minute of this project and I hope you enjoy it as much as I have making.

Again a special thanks to all who have helped me along the way to making this piece, and in particular (even though it’ll embarrass them should they ever read this!):

John and Lilian Hill

Eden Bluebell Peskett

Jane and Steve Mercer

8WT

Jane at Cheatwell Games

And again, everyone who has helped out on this project.

Until the next project, take care and thanks for reading. :)

Professor Marble A.K.A Joe.

Wednesday 4 May 2011

Extras Bits I forgot to Add to Last Post


To celebrate it’s finality, here is a final video of me explaining the piece once more before it was dismantled and put away, which took over 2/3 hours until the room was back to normal!

I've also included the production stills of the video clips I used for you to see in closer detail.

These photos also show the close-ups I included by zooming in on the original film then adding a black border around it and playing them in sync.


Check back soon for my final sign off for this project after the exhibition. :)
Take care,
Joe.

Editing and Final Exports! IT'S FINISHED!

Hello and sorry for the delay in posting it has been a massively stressful and busy period these past few weeks!

But, on the absolutely fantastically positive side, I HAVE FINISHED THE FINAL EXPORT OF THE FILM AND IT IS 100% COMPLETE!!!! :)

I am ABSOLUTELY over the moon with the final piece but here I will explain the monstrous journey it took to get here!

Editing itself wasn’t too hard as I was able to use my expertise if you can call it that with playing drums to move pieces into the right tempo etc. but the main thing was getting the visual to sync up correctly with the audio when I had to manipulate pieces.

This was VERY stressful as having to hear something so repetitive as the guitar sound over and over and over again was a task like no other! What began to happen was the visual was all lined up perfectly and looks great, almost the final cut for the visual I reckon. But the problem was the audio and drums went in and out of tempo due to the timings of them being shot etc. so I had to spend a lot of time cutting the drum audio and recorded drum track in the environment to fix this problem and make it smoothly play. I had to do this for most of the piece as bits and bobs had higher and lower volumes on the video and so I essentially re-mixed the song as a proper song, and then added the visual to put it all in sync again.

As you can imagine, this was pretty much double the amount of work as I made the piece twice technically but never the less once it was done it was the most wonderful feeling to know it was sorted.

But as with everything there is always room for improvement, but staying your hand is a wise move too. I say this because as I exported it for the final time, as I viewed the video in Full Screen Mode, I noticed that as the CD player is turned on, the music plays but in the next clip the CD isn’t moving.

The horrible moment when your stomach lurches is exactly what happened at this moment as this was luckily noticed very close to the deadline.

So once again I went back into Final Cut Pro and had to re-edit my perfect order/mix to accommodate this continuity error.

This took longer again and once it was fixed, I re-exported it and realised it was still 2 seconds out!

So repeated the fixing process, exported again and it didn’t work again!

This carried on until 8th time lucky It was fixed properly, no continuity errors for this part, no glitches just smooth edited movement from one scene to the next and at last I slept.

I still cannot get over how long this took and overall in this project I’ve realised I REALLY need to organise and plan much more than I already am because this was cutting it too close for comfort.

Never the less. IT. IS. DONE. And I am exceptionally proud of the end result. :)

That’s it for now until the actual exhibition. Unfortunately having left this so late/been unprepared in too many parts I haven’t had time to create my idea of a mini marble run turning on the TV and playing my film.

So for the exhibition I will be now be showing this on the show reel, hence the titles at the beginning instead of just starting as I’d first thought of doing once the marble hit the “Play” button.

I’ve also added Jazz influenced music and text to hype up the piece and then the viewer come to find that the film is not as epic as the music and text make it out to be. This all adds into the tongue in cheek science experiment feel of it all, along with the title I have finally decided on with help from friends and family, which is:

“Professor Marble and His Music Machine”.

I worked with a lot of titles for this piece such as “Marble Run Music” and “Music, Marbles and Machinery” but this one I find sums up the playfulness of the piece as well as retaining a scientific feeling to it. :)

So that’s it for this post but check back soon for my final sign off for this project and a link to the final piece on my Vimeo plus find out how the exhibition went (although technically this is after the deadline I hope you won’t mind!). :)

Take care,

Joe.

Sunday 24 April 2011

Extra Extra Bits From Filming!

Here in this post just quickly is the video of me playing the keyboard/solo part of the music for you to see in full. This is the video shown playing on the TV in the piece and the audio is exactly the same as here.
Also I apologise in advance for the creepy stares of me playing the Keyboard, I was very tired and trying to look serious yet also comical haha! I hope that has come across instead of creepy haha!
I've uploaded it mainly to show that it wasn't a pre-recorded piece just played over the top of the visual, it was actually me playing it live (technically) through the TV and not just an MP3 file.


Speaking of MP3 files,the second thing I've uploaded is the MP3 file of the Bassline which i burnt onto CD and is played through the CD player. Here it is as a quicktime file but I just thought I'd document it as it's a crucial part of the piece and thought it should be heard in full, without chimes or Xylophones getting in the way.


And finally here is a photo of the aftermath of the Party Poppers scene where we had to clear up a lot of confetti! But the scene is one of my favourite so I think it was worth the ffort of cleaning up. (P.s after I took photo I did help to clean up, I didn't just leave my Gran too!)


That's it for this post but check back soon for how the filming went. :)


Take care,
Joe.

Saturday 23 April 2011

FILMING IS COMPLETE! (From My Grandparents Coming Home to Final Completion and Ready For Filming!)

FILMING IS COMPLETE!
Yesterday I finally finished filming and all is well. :)

However, filming did not go as smoothly as planned.
Firstly, making the bassline and keyboard riff to go along with this piece took much longer than expected. Luckily this was done the day after my last post (Thurs 21st) and so that whole day was taken up making those pieces and exporting them ready for filming the next day.

Sadly though, the filmed Keyboard bit didn't work. I had made recordings of the machine working so that I could figure out how long the piece was going to be (e.g. how long the marbles took to turn on the CD player and Xylophone etc.) and so how long the bass lines/keyboard bits had to be as well.
Once I'd done this I set about recording the keyboard bit to fit in with this time frame and my drumming tempo so it all ended at the same time, but the piece I'd recorded didn't fit properly.

So the day of filming properly (Fri 22nd) I got up extra early and re-recorded this keyboard piece in a different location too as I filmed it against the white background at the end of the room and unfortunately got half of the robot part of my machine in next to me.

These minor setbacks were incredibly irritating but after re-shooting on a totally white wall in my Grandparents bedroom and fixing the music I got the keyboard part fixed and ready to go with the rest of my machine so ultimately it worked out for the better. :)

Making the recordings of the machine for timing issues was a massive help as the tempo could be adapted easily since I was playing it, not a machine and so everything fitted together well and filming could finally begin. :)

On the other hand, when it came to actually filming we had more issues again!


Firstly we had less time due to re-shooting the keyboard scene, and secondly I realised that since I was going to be behind the drum kit playing, I couldn't operate the camera as well!
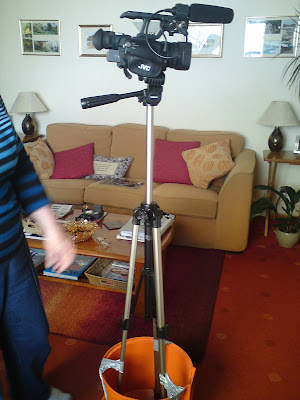
So as you can see in the small video I've uploaded and the photo, my Gran and myself constructed a makeshift dolly out of her vacuum and I taught her how to operate the camera.
Originally I did say I was going to use straight shots but wondered if it would look better on the day if we could figure out a smooth camera effect. Here is a photo of the makeshift dolly:


Although she did a good job, the camera itself was too shaky due to the dodgy wheels and floor, which you can see in the video although this is on concrete in the garden.
However, even on carpet the camera jerked and joggled around so in the end we came to the conclusion of using straight shots again. It would have been lovely to have straight smooth shots following the machine as it worked, but sometimes you’ve just got to do what you can with what you’ve got so I stuck to my original plan of straight shots.
I remembered how earlier I had said I would film from different angles as if it were a dangerous experiment so I think it will be fun and more visually exciting this way actually as static cameras mean you can see what's going on, no realistic camera shake or distracting movement, for example my film might have ended up like the camera work in “Cloverfield” where many complained of feeling sea sick due to trying to focus whist the camera jostled around wildly!
I really wanted to avoid excessive camera movement since my subject was so small (seeing the marbles fly past is quite tricky!) Plus when it actually came to filming, the amount of time it took to re-set up each piece was longer than expected, let alone trying to do this in one solid take so static camera was a fantastic choice!

Once we’d decided what type of camera movement to use, we began by making a list (which I’ve uploaded) of what shots we needed and the order of importance. The most important shots were the ones where I was present, as after that I could do the close-ups of the machine working on my own, allowing my Gran to have a rest as she’d done so much for me already.
So starting with the beginning and working as chronologically as possible, we shot all the scenes of me playing the drums/with me in the background as the machine worked and then once these were done the end scene after the marbles have hit the cymbal and I set off the printer scanning.
I’ve also uploaded a photo of the aftermath of the final scene with my Gran’s help, where we spent ages cleaning up bits of party popper confetti!
Even though this wasn’t the last scene all together, it was a wonderful way to end working with my Gran as it’s a celebration of the film chronologically ending, and also of our time working together so she could at last relax after I’ve taken over her front room for weeks!
I still feel that this piece could have been completed a lot quicker if I stuck to original plans as I have a habit of working on something and still continue to think up new ideas and adaptations to a piece, when in reality the original works fine and we’re running out of time!
I found this out when working with Simon Wills on MEDI 262, The Experimental Animation Project, and as much as I try to change this habit, I love to experiment and keep developing ideas. It’s going to be very hard to stop going the extra mile as in some ways it’s very handy and beneficial as a lot of errors are found by re-thinking every angle, but at the same time I think I need to stop being a perfectionist at times and relax and trust what has already been designed. I’ll keep working the way I do, but I think I shall be more realistic in future when it comes to making pieces to a timeline. It’s all about balance and this is one area where I will work on balancing these aspects of my work method.
Moving on, once the shots with me in were done, we had a small break for lunch and then I cracked on to film the close ups from as many angles as I could so that even if one didn’t work, I had plenty of “Plan B” backup shots which could. This is because after the filming was done we were going to start dismantling the machine and so the more I filmed, the safer and more prepared I was should I need another angle in post-production, but be unable to re-film due to the machine not existing anymore!
The close-ups went well and I got all I need but again it took much longer than anticipated so once all the footage was collected and completed, I backed it all up and slept properly for the first time in ages!
The next time when it was day again I was able to record the background noise through the camera and also record the bassline and keyboard and all the other instruments playing on their own in the environment. I was going to do this on the night of filming but it was so late when I finished that I couldn’t have recorded the drums etc. for example without waking people up so the next morning I’ve recorded all the pieces in the environment just in case in editing the videos don’t quite match up musically, and so I can then add in bits of the music as the machine’s will be mostly off screen and so the edit will remain unseen/unheard.

That’s it for today but before I sign off for today, I’d just like to point out that the piece does actually work overall and so this truly is a kinetic sculpture and not just a fake created through editing alone.
I know that most sculptures like this do use cuts to make it seem seamless but even then the machine does work, it’s just due to time and money etc. that it is easier to cut and paste it all together from takes than wait and re-setup every time and hope it works perfectly throughout.
I was very worried about “cheating” and editing it all together like this but in my opinion now, I am not cheating as the machine does work all together as a full piece, but I have simply filmed it in the easiest way and still retained the fun and working merit of this piece.
So I hope that’s cleared up everything, although it was mainly just for my conscience as I was worried about the piece losing interest should people think I faked it due to the many different cuts, it is a real and fully working kinetic sculpture, I’ve just filmed it in the easiest way due to time and money etc. :)

So that's it for this post but check back soon for my post on how the editing went and what is left to do. :)

Take care,
Joe.


Thursday 21 April 2011

Extra Bits From Finishing The Physical Aspects of The Machine


Here before we move onto the filming etc. are some extra bits of information etc. I wanted to point before the final shoot.
Firstly, the cat and keyboard you see in my post before the last (before I finished the physical machine) were taken out due to the fact that the final layout I have chosen was so much easier to work with and assemble than figure out how to get the cat to walk (the On/Off switch was on the bottom of the cat so very hard to get to with a marble etc.) and the keyboard playing only one key sounded rubbish if I'm honest.

Secondly, I have attached a video of the Guitar sensor in action so you can understand what I was trying to explain about why the sound will come out when the laser from the sensor is broken.
In the video I move the guitar sensor in front of the camera causing the sound and so just replace the camera with the marble holders on the elevator and I hope it's easier to understand how the laser (the blue light you can see on the sensor) is broken when you see the final video where that guitar sound is coming from. :)

and Finally I have added the final photos of the Machine, showing the full thing at the end and then in 4 parts starting from the drum kit and ending on the robot, all ready to go for filming. I was talking about how to show how much has gone into this piece without making it boring using long panning shots. Basically I just wanted to show the machine in it's full form but didn't want this to drag on so instead we came up with the idea of showing these final photos in order at the end of the film. That way I can show the machine completely but not in a slow and dull way. :)

We've also added a yellow/black/silver colour theme and the extra clockwork robots I had to cover up the Blu-Tack and Duct Tape fixtures throughout the piece, and tie it all together with what I believe is a professional look and feel and I hope you agree it works well.
The robots were going to walk off the edge along with the Daddy Fantastic robot but didn't have On/Off switches and so I couldn't keep them stationary until set off, they just kept walking if wound up.
So instead I have placed them throughout the piece to pretend to hold up track/maintain the piece, which again links to the influence I had of clockwork, cogs and gears and machinery sustaining machinery, which rounds off the feel of this being a machine and robotics inspired piece nicely in my opinion. :)

That's it for now but check back soon to find out how the filming went and how editing went as well. :)

Take care,
Joe.


Wednesday 20 April 2011

PHYSICAL CONSTRUCTION IS COMPLETE!

As the name suggests, PHYSICAL CONSTRUCTION OF THE MACHINE IS COMPLETE!

It's taken absolutely ages but at long long last, it is fully complete and we are ready to film. :)

I'm only going to do a small post as I've done a post that explained all of what happens in the film out in text but it got deleted and so since I am absolutely shattered from working non-stop to finish it physically, I am going to upload a video at the end which will explain the machine so I can finally sleep properly(ish).
I say "ish" because tomorrow I'm getting up early to film the keyboard scenes and make the bassline which will play through the CD player.

So yeah, that's it for now, I am over the moon that it is finally finished but I think it's time for me to rest and prepare myself for filming soon. :)
Check back soon/tomorrow for the extra bits I have of finishing the physical piece, E.G. Photos etc. :)
Take care,
Joe.

Saturday 16 April 2011

From Dismantling the Drum Machine To Grandparents Coming Back


Hello well as the name suggests, this is my post about the time from when I had to dismantle the main drum machine up to my Grandparents coming home and running out of time.

As you can probably tell, I didn't finish the piece before they came back. :(
But on the plus side, my Grandparents are incredibly understanding and said it was fine to leave it all up and carry on until it is finished which is just amazing of them!
However, not everyone is going to be so caring and understanding so in future I REALLY need to buckle down on planning and make sure everything is 110% ok and that I have been realistic in my approach. In fact, even then as long as I at least make sure I have time for errors, when I do any projects in the future. :) A very valuable lesson indeed and one I am certainly going to use and remember completely in the future. :)

So moving on, since dismantling the drum machines, here are some photos of what has been created so far:

Firstly we have the drum kit added in and the printer next to it. As I raise the Hi-Hat, this will release a ball bearing along the massive marble run stretching in front to turn on the CD player and play the bass line.

Secondly we have the CD player itself and the Xylophone which is turned on by the ball bearing which turns on the CD player. This marble sets another going which turns on the motor you see on top of the bass drum, which is how the marbles hit the Xylophone and repeat.

Thirdly we have from there (haven't yet figured out how to set this bit off) a motorised cat toy which, when the on off switch is pulled walks forward meowing until it walks into the basket. This basket as it rises up from the weight of the cat pulls the "on/off" switch for the second motor into the "on" position. Once this motor is on, it drops marbles down onto a key on the keyboard and repeats.

And finally here we have my own D.I.Y. which I did for my remote control robot. The plan is to have his switch turned to the "on" position somehow and then by Blu-Tacking down his remote control to go forward he will keep going to trigger something else. unfortunately the remote control when activated made a loud robotic sound, so using some pliers I cut the wires to the speaker in the remote control rendering it silent but still working. :)

This alone has taken a mammoth amount of work and little sleep, and still I'm not even halfway!

Never the less, all progress is progress none the less, so with thanks to my Grandparents and Eden for helping me out tremendously so far (Eden has stayed with me all week to keep me company and help me out which is more than a sign of a fantastic girlfriend if ever I saw one!) I will end this post for tonight, get some sleep and crack on tomorrow. :)

Take care,
Joe.

Wednesday 13 April 2011

Links To My Extra Research

As you couldn't actually click on the links from my presentation slideshow pieces, here is the link to a part of "The Way Things Go" by Peter Fischli and David Weiss (the whole thing is 30 minutes long!) and also Honda's - "The Cog", which have both been very influential on how certain parts can be achieved.

The Way Things Go by Peter Fischli and David Weiss:

http://www.youtube.com/watch?v=GXrRC3pfLnE

Honda - The Cog:
http://www.youtube.com/watch?v=_ve4M4UsJQo

That's it for now, but check back soon for how the final piece is coming along. :)

Take care,
Joe.

The Main Drum Machine

Hello here today in this post is my work so far on creating this final piece, and sadly things have not been going very well.

In short, the main drum machine works nearly perfectly every time but sadly trying to keep the two in time with each other is proving very difficult due to all manner of things such as marble speed, velocity, motor speed, whether the elevator will pick up the marbles properly and not drop them etc. etc.

There was a lot which went into trying to make this piece of the machine (the main blooming piece!) work but it seems that I am going to have to go with my Plan B option.
This plan B option is that I myself will play drums and have the machine/marble run pieces working around me whilst I play.
There are a lot of benefits to myself playing this part of the music as being a drummer, I can mentally keep the beat and adjust should it need it, I can alter and change the beat to make it more interesting and also I can have direct control over how the piece works and moves from one instrument to the other in time.

This seems a very easy transition but the amount of work that has gone into this main piece is making it very upsetting to just dismantle it all and recycle it for other pieces. It's lucky I can recycle it in the first place otherwise this would be much much harder!


The worst part of all of this however has to be that I have wasted precious time I needed to make this piece properly before my Grandparents are back so fingers crossed I can advance quickly and get back on track. :)

Never the less it's all a learning curve and I've learnt a lot from just this hiccup so I am ready to move on tomorrow and get back up to speed with it all.

Before I move on however, here are some photos of the piece before it was dismantled (and also my sleepy helper Eden Peskett who agreed to help then fell asleep under the table bless her!).

I did have a video explaining how the pieces worked but unfortunately it will not upload due to being a uncommon file format so instead I will explain now what happens with this piece of the machine.


Basically, a marble is released down a cardboard tube (not seen in these pictures but it was by the Tom Drum) at the back to turn on the Tom and Snare's elevator motor. Once this is turned on the marbles start going round and as the elevator turns, one of the marble holders has a piece of string attached to it.
This piece of string is attached at the other end to a piece of card which, once the marble run has pulled the string tight enough, moves out of the way as the marble run pulls it and releases a ball bearing down the run to hit on the CD player.
Meanwhile, I hadn't sorted out how to turn on the Hi-Hat machine but the motor simply lifted up the marbles to drop onto the Hi-Hats and then they were caught by a small hammock type piece which stopped them missing the run and then went down the run back to the bottom of the elevator to repeat the process.

As you can tell, it took a lot to get this machine working but onwards and upwards as they say so check back soon to see how the project is carrying on. :)

Take care,
Joe.


Monday 11 April 2011

The Ups and Downs of Getting Ready For Finally Finally Making This Piece!

I'm sorry there's been a delay in my posts but things have been up and down for a while but finally I am out of the woods and ready to crack on tomorrow with actually, physically and finally making this project.

The main problem that has kept me from posting on here has been getting all the props down to Plymouth from home and then finding I can't use the Scott Building's sound room (108).

This was a massive blow as someone had booked the place out for a week or two, which was firstly annoying for me as now I didn't have anywhere to make my piece, but secondly an eye opener as I was going to do the same and realised how unfair this would have been!

Without a place to make my piece, I started to panic but with the help of family and friends I have thankfully found the most perfect place to make this piece!

Here is my list of possible ideas for where I could make my piece:

Scott Building 112/the balcony part (worry about people touching it etc.)
My room in Plymouth (possibly going back to the alarm clock idea as can't move bed?)
My house in Plymouth (what about everyone else though?)
My house/living room at home? (Again putting everyone out)
Renting a recording place down where Jeff's band used to rehearse? (Depends on money and how long I can book a room for)
Grandparents house? (Again putting them out)

The result was one of incredible good fortune as my Grandparents are going on holiday for a week starting Saturday 9th - sat 16th so they have ever so kindly let me use their front room/dining room to create and film my final piece! :D :D

This is fantastic as I only live 10 minutes away and so can either stay the night at theirs should I work late, or go home when I please!

However, now that I have a place does not mean I can relax, as I am posting this on Monday 11th April and so after my Step Dad Steve very kindly drove me back to Plymouth to collect everything, we then took it all my Grandparents and began setting up the area in which I am going to work. My Grandparents also very kindly left some white sheets which I could pin to the walls for a background as they were going to re-paint it soon anyway.

So as of today, me and my Step Dad Steve have moved all of my Grandparents stuff out of the dining room and carefully sorted it away into the spare room and have put up half of the backgrounds and moved my drum kit in ready for really cracking on with it tomorrow.

Unfortunately we only had two sheets so I'm hoping I can borrow some from my Mum if she has some!

Other than that, here is a photo of the boot with all the props I am going to use (Yikes! Was not the word when we realised we had to fill the boot more than once with all this stuff!). :)


That's it for now so check back soon for how the project is coming along!
Take care,
Joe.

Sunday 20 March 2011

Second Presentation and Preparing for Making the Final Machine!


Here is my second presentation explaining how far I've gotten with making the final piece for this module.

Starting with the title slide for obvious reasons, the second slide shows what I have completed up to two days ago and then goes on to explain my inspirations and further research and then how I am going to do it.

The plan is to create this in Room 108 in Scott, starting with the main drum machine first and then building the extra bits around it.

The theme is also going to be a tongue in cheek styled science experiment which will consist of different cameras filming the piece as it's runs through.

The examples shown are those from my previous post showing the main drum machine pieces I made over Christmas and finally I am thinking of exhibiting this piece as a stand alone piece on a TV in the main exhibition area.
The TV will be turned on by a smaller marble run which the viewer will set off themselves when they wish to view the video.

The presentation itself went well except I couldn't show the videos due to not taking my hard drive with the original files along with me, but still all went well and I just hope I can live up to the expectations people have for this style of work. :)

Other than that, all that is left to do now is to crack on and finish this piece so check back soon for the beginning of my final piece diary and making this project a (hopefully fully functional!) reality. :)

Take care,
Joe.


Thursday 10 March 2011

Prop Research and Final Designs/Layouts

Here, Before I show my second presentation is some prop research I did at the House of Marbles near Dartmoor:


I was thinking of using these for the rest of the piece to turn on things (for example the hamster in a wheel could turn a conveyor belt) and also for the overall look (e.g. the Eyeball Marbles looked awesome but were so expensive!).

But since these props were very expensive (don't get me started on how much the cherry picker lift was!) Here are my final designs which unfortunately do not include these props, but do have inspiration from them:


Firstly, i'm sorry about the poor quality, but if you can read it, you can see that I have decided against using the Sparkfun Arduino Starter Kit.

This is because I feel that firstly it would be very expensive to get all the starter kits etc. but secondly and most importantly the piece will gain more attention if the actions can be physically seen, e.g. the point is to show how ordinary things/actions can make music through purely physical contact.

And yes I do agree that the pads might work and give the piece a more professional feel but I personally believe it would look more impressive and realistic if the marbles hit a cd player “play” button rather than a pad which could easily have sound edited over it, thus making it more professional by being actually real!

By working in this way I can also relate more to my inspirations like Wallace and Gromit and Pee Wee's Breakfast Machine.

And secondly, these designs and layouts are how I am going to make the final piece, which I'm hoping to construct in Room 108 of Scott Building.
This room has a large window into the sound proof booth and I've had the idea to link back to my original inspiration of the Diet Coke and Mentos experiment and make my own piece a tongue in cheek styled experiment. I was thinking of putting the marble run in this room then filming through the glass and also from different angles as if it is a dangerous experiment and we had to use security cameras in fixed positions to film it, for fear of getting too close.

In these plans I have also included a list of props which I have collected and still need to include in my machine.
As you can see there is a lot of stuff going into this piece so fingers crossed I can pull it off successfully!

Here finally is my doodles and designs of how pieces could work. Most of my ideas start as drawings and from there I visually draw what will happen/I would like to happen and then I figure out how to make it a reality.

That's it for this post so check back soon for my second presentation and preparation for finally making this piece! :)

Take care,
Joe.


Monday 28 February 2011

Extra Workshops and Inspirations

Since I last entered into this blog, a lot has happened in terms of where the project is going and how.

We’ve had extra workshops these last couple of weeks on a specialist subject of our choice. This allowed us to hone in on what specifically we wanted or needed to learn in order to create our chosen ideas. I chose advanced HD studio work which was I thought was going to be a workshop on using dollys and runners to get smooth camera work, but instead if was on lighting and although this was still very helpful, I needed to learn how to keep a smooth camera for keeping up with the marbles on my machine.
Never the less the other workshop I took part in was a 2 parter on “Creative Programming” which consisted of using coding and processing of data to make things happen via a computer.
Examples of what we made are simple exercises such as a trail of colourful balls to follow the mouse as you go across a page and a synthesiser type programme which responded to your mouse’s movements up down and across the screen by changing the pitch and frequency of a sound it emitted and also the colour of the box in which you moved the mouse.

However, the main thing that processing could do was that using what Chris our lecturer called a “Sparkfun - Arduino Starter Kit”, we could collaborate the processing with these physical pieces of computer chip and equipment to make the marbles set off sounds and lights by moving past sensors and hitting pressure pads! This sounded fantastic and the Sparkfun - Arduino Starter Kit is roughly £50 so although it’s very expensive, it might just be worth the money if it’s going to make the machine look even better!

It’s still early days but this could be very beneficial to making my project seem all the more professional so check back for how my plans may include this technology.

Moving on I’ve also included some videos here which help influence my idea of an alarm clock and the machine waking me up.
This video is of my Wallace and Gromit Alarm clock which as you’ll see has an alarm clock which sets off a ball bearing to set off another at the top of the clock which comes down to hit bells and a button which sets off a Cockerel sound at the end.
This (very noisy!) wake up is what inspired my alarm clock idea overall as it was a present for Christmas which I’d seen around the time I was debating more narrative before voicing it on here, but I have decided I am going to stick to my original plan of the machine making music only.
This is because with videos such as “Crème that Egg!” I find the main purpose or narrative is lost halfway through the piece as you focus more on what the machine is actually doing instead of why, so I feel that my piece will work better if it is machine only and the music carries a narrative as it includes more and more “instruments” to it.

Moving on from the workshops, I've also included some inspirations I have found along the way to where I am at the moment with the project.

Firstly here is my Wallace and Gromit Alarm Clock:


Also here is the Google logo as a machine which I found very interesting:


And here is an advert which had a similar style of machine:


And finally here is a tryout I did of a train I bought trying to play the xylophone pieces.
Originally the plan was for the xylophone and train to be going around underneath the main drum machine or something but as you'll see and hear the xylophone bits aren't very loud so I'm going to re-think this bit:


These inspirations etc. have been collected over the months and in my next post I will show my second presentation as we get closer to Easter and actually making this piece. :)

Take care,
Joe.

Friday 25 February 2011

More research and Proposal

Here is the extra research I have partaken in to further my ideas on how and what my marble run is going to do.

Starting with “Rube Goldberg Machines”, these illustrations are the foundation upon which all other styles of machine like this are based. These cartoons are humourously clever ways to extravagantly do a very simple task such as make breakfast or open a door.
Speaking of breakfast too, a machine such as the ones described can be seen in a film called “Pee-Wee’s Big Adventure” by Tim Burton and starring Paul Reubens.
This machine “Pee-Wee’s Breakfast Machine”, is a real life version of the cartoons by Rube Goldberg and both have been massively influential on where my head is at presently.
At the moment, I am debating whether my machine should make more than just music and perhaps should have a narrative and a purpose such as making breakfast or opening a door.
An idea I’ve had is to have the machine wake me up by an alarm clock setting off the marble run to make music and possibly breakfast.
This would be a big copy of “Pee-Wee’s Breakfast Machine” but at the same time I believe I can alter it enough to be more original and have a very different narrative, focusing on waking me up instead.
My final bit of research for this post is from a Youtube video called “Creme That Egg!” which, like Rube Goldberg’s work shows a very elaborate “A affects B” kinetic styled sculpture which eventually results in the egg being crushed.

Again these pieces I have spoken about all have a narrative and so again I am wondering about my own piece. Will the music being made be enough to keep the viewers interest? I am going to look into this more after this post so as a final note, here is my proposal I handed in a while ago but have forgotten to upload. I’m terrible at remembering to upload!

My proposal:

Joe Skinner - 10203714

Media Arts – MEDI 259

10/1/2011

MEDI 259 EXPERIMENT MODULE PROPOSAL:

MARBLE RUN MUSIC/THE MECHANICAL INSTRUMENTS

For this module project I am going to be producing what I have titled at the moment, “The Mechanical Instruments” or “Marble Run Music”.
These are just working titles for now, but the actual piece is going to be a combination of chain reactions, cause and effect, marble runs, Dominoes, Drums, and other instruments and objects all working together and affecting each other to make music and sound.

The initial idea for this project began when I was younger, where I played with Lego and other construction style toys.
I started exploring and became fascinated by the mechanical side of inventions, the nuts and bolts of how such things work. As I got older I extended my enthusiasm through looking at processes of mathematics and interconnecting movement, such as cogs and gears, the binary use of computers (i.e. If User answers A, continue with program B etc.) and mathematics itself.
However, it was during the lectures that we had at the beginning of this module, in particular one on “Space and Time”, and the Carousel workshops (of which I took part in Strands “A” and “B”) that I saw how this idea could become a physical reality.

Originally, after working in the Strand “A” workshops on animation and using “After Effects” software, I had planned to combine a chain reaction piece with some form of animation so that the two combined to create an interactive story.
Sadly though, the more I got into this idea, the more I realised that that would be just too much work and there would have been no way of creating such a piece to such a high standard, let alone alongside my other modules!

Going back to the drawing board I went on to look at using the chain reaction side of this project to tell a story somehow, and it was this expansion of the idea which led me onto the inspirational work of Eric Staller and in particular his piece entitled “KNIKKERBAAN”.
KnikkerBaan translates from Dutch as “Rolling Ball”, and the piece itself is a giant marble run created for a reception in a Dutch school. The marble run works by children moving a ship’s steering wheel that releases footballs onto a marble run styled track.
These footballs are then kicked up an elevator by football boots and then dropped down a run, triggering different sounds and lights as it descends until it is shot into a goal at the end and put back on the elevator by a goalie, ready to repeat the cycle.

The almost perpetual movement and consistency of this marble run is what inspired me to create a piece based on a marble run. I would then, instead of using animation, tell a story via music and sound.
From here I have furthered my research into this genre of physical chain reactions and cause and effect by looking at the work of Tim Hunkin, and in particular his Television show “The Secret Life of Machines”.
In this show, Hunkin explains how everyday objects work and then creates his own version of them. Watching Hunkin create his own versions of these objects, e.g. a fax machine, I recalled the “Wallace and Gromit” clay-mation films by Nick Park and the inventions and gadgets they created in those films, for example “The Wrong Trousers”.
The “D.I.Y” nature of Hunkin, Staller and Park’s creations really inspires me and reminds me of when I first became interested in how things work.
This cause and effect solution to working made it a natural decision for me to create a “D.I.Y” musical invention in my own unique and un-conventional way.

As of the 4th of January 2011, I have completed the main blueprints and actual construction of the main machine, which is the piece that will create the drumbeat providing the backbone structure and timing for the entire piece.

This main machine works by using a marble run with an elevator to bring marbles up to the top of the elevator and drop them down a chute onto the heads of drums with enough force to create sound from the drum and then bounce back onto a second track, which returns it to the elevator to repeat the process.

I’ve started with this machine, as the entire piece relies on it being completed and perfected, i.e. the timing and beat had to be laid down first and as close to perpetual motion as humanly possible, so that I can have the freedom now to gather the other materials and tweak the final blueprints of the other music making machines.

To make this project however, I have come to realise through the Carousel Workshops and lectures that working in groups is very beneficial to the overall outcome of a project.
For example, teamwork during the process of trial and error whilst creating must be balanced and co-operative in order for a successful outcome.
Alongside this need for excellent teamwork, I also need good communication between the team members and balance in general. A heck of a lot of patience is needed as well, especially when working with a project such as mine where physics are a large part of production yet I have very little knowledge of the subject!
This became apparent particularly during the “After Effects” and “Rotorscoping” sessions of the Carousel Workshops from Strand “A”, where a lot of work was essential for completing the tasks that wouldn’t be possible to finish without assistance.

To complete my project to the highest level I am capable of, I will be enlisting the help of friends who are also Media Arts Students, (and anyone from home I can drag in too!) to assist me in constructing the machines.
The equipment is all blueprinted, but there are certain effects and techniques which I have developed and applied successfully whilst constructing the main machine and the plans for the other pieces. To help achieve the highest level, I will be explaining these techniques and effects as I build and direct the construction of the project alongside everyone who is willing to help.
This way I am directly involved with the project and can steer it in the best direction for successful completion and quality.

The actual piece will be constructed and filmed in one of the photography studios up on the second floor in Scott building.
I still need to speak about renting out a space but the actual project will not take up much room so even a corner in one of these large studios, out of the way of everyone, will be sufficient.
I understand that I may not get a lot of time to work in these studios, due to pressure on space and time from other students wanting to use it, so to work efficiently as possible, the overall piece will be broken down into individual components and built separately as prototypes outside of the studio to clarify they work correctly, and then re-assembled in the studio and connected together to complete the final installation for filming.
For example, I have already completed the prototype for the main machine and so am now working on the other parts and how to connect these machines to the main one.

I will be presenting this piece as either a video on a show reel, or if it is permitted I would really like to create a mini installation in the same vein of the actual piece, which will combine a marble run and other objects using chain reaction to turn on and off a television which will show the actual piece.
This marble run will be interactive in that the viewer will be able to set off the marble run to view the video of the main piece.
The actual installation will not be very big or complicated which will make it more accessible to anyone, and in view of the materials used, it may appeal to those in the younger age groups.
However the nature of the project can be understood and appreciated by anyone, resulting in a non-specific target audience.
In terms of exhibition space, the physical piece will be able to be moved to a more appropriate location should it need to be.

Bibliography:

Eric Staller – KnikkerBaan. Eric Staller. Eric Staller 2003 – 2007, all rights reserved. 10 Jan. 2011.
.

Staller. Eric. Out Of My Mind. Amsterdam, the Netherlands: Staller Studio Nederland, 2006.

Tim Hunkin/Tv Index”. Tim Hunkin. Tim Hunkin. 10 Jan. 2011.
.


Also as a final final note, here are links to the influences I have noted here for you to see for yourself ☺ :


“Creme That Egg!” - http://www.youtube.com/watch?v=vrCb_fNmSTA

“Pee-Wee’s Breakfast Machine” – http://www.youtube.com/watch?v=NWd5D8wUc88

Example of Rube Goldberg’s Illustrations - http://www.google.co.uk/search?um=1&hl=en&client=safari&rls=en&biw=1024&bih=851&site=search&tbm=isch&sa=1&q=rube+goldberg&aq=f&aqi=g10&aql=&oq=

So that’s it for this post but check back soon to see how what conclusion I have come to and how things are going from there. :)


Take care,
Joe.